Recently Justuno asked the Fuel Made team if we'd like to submit 3-5 templates to their library. So naturally, we came back with 10 we thought would bring the most value to ecommerce stores.
These templates are relatively easy to use but we have lots of tricks up our sleeves and I didn't want you to miss out on them.
So in this technical, but very actionable article, I'll hold your hand each step of the way.
First, I'll share general pop up information to help you select the right structure for your needs.
Second, I'll dive into the technical set up details.
1. Selecting the right pop up structure
Fuel Made is a marketing agency that works with Shopify and Shopify Plus stores. Our email marketing team is specialized in Klaviyo and any tool that works best with Shopify and Klaviyo (Justuno being one of these).
We created these ten templates based on the pop-ups we typically set up for our clients. These brands operate in various industries, so we picked pop-ups that could work for many different scenarios.
How to download templates
You can find the templates directly in your Justuno account within the Template Library. Scroll to the bottom to find the "Partners" section, where you can select "Fuel Made."

Our different pop-up templates
We uploaded ten templates in total, but this article will focus on the eight that are lead capture pop-ups:
- Email + SMS + Checkboxes - DESKTOP
- Email + SMS + Checkboxes - MOBILE
- SMS + Email + Dropdown - DESKTOP
- SMS + Email + Dropdown - MOBILE
- Email + Dropdown - DESKTOP
- Email + Dropdown - MOBILE
- Email + Checkboxes - DESKTOP
- Email + Checkboxes - MOBILE
The first four pop-ups capture both email and sms, while the rest focus on email addresses. You can also see that half include checkboxes while the other half include a dropdown.
Why an intro screen first and not an email capture?
Most pop-ups start with a screen showing the email capture field. Ours don't. That's because we're applying a couple different sales strategies.
1. Value first.
We focus the first impression on the value that we're going to bring, rather than our "ask." The first screen only mentions the offer that we're giving away because we don't want the viewer to think about the fact that we'll need something in return (an email address).
2. Commitment and Consistency
Once the reader has processed the offer we're giving them, and decided they want it, they're going to click "Yes" to make it to the second screen. This step represents a micro-commitment.
It might seem small, however, it's a physical representation of their decision. Once they've made up their mind, humans have a tendency to want to stick to their guns and be consistent.
By showing value first and getting a micro-commitment from the viewer, we increase chances of them following through and giving us their contact information.
Side note: I'm sure you've seen pop-ups with snarky "No, I don't like saving money" type of buttons. As you can probably tell, I'm not a fan. Forcing viewers to select an option that makes them feel bad isn't a strategy that I'd recommend. It leaves a bad taste and makes you look arrogant.
Gif or photo?
Dropping a gif in the design is a great way to increase engagement.
The movement will grab your visitor's attention and make your pop-up stand out from the norm. On top of that, showing off different products makes it more likely your visitor will see what they like.
Here are a few tips from our designer for making a good pop-up gif:
- Be aware of Justuno's image size limits. All images or GIFs have to be under 1mb, so keep animations simple and compact.
- Adding animated full-screen background overlays can be a great option (under Overlay settings shown in the image below). But keep in mind that this background image can't be changed from screen to screen; it will be the same for the entire pop up.

- However, you can get around that by expanding your actual pop up size in the upper right hand corner. Under the Layer Positioning set the size to as large as you can get it, pretty much full screen, then add background images in the Custom Graphic options in the right hand panel.

- Another cool option is to add a simple rotating image featuring different products or text animations. Those can be changed from screen to screen or taken out completely for screens that already have a lot of content (like SMS submit screens with lots of fine print).
- A fun way to add just a touch of animation is to add a couple small image layers to the layout, as you can see in this Cocokind post-engagement screen:

The reminder tab
We often include a reminder tab in these promotions to increase engagement. If a reader closes your pop-up either by mistake or because they weren't ready to sign up yet, this tab gives them the option to re-open your offer.

Make sure you test the tab on different pages of your store to confirm it doesn't interfere with any important section. Also keep it in mind when making updates. You want to be sure you’re still following website accessibility best practices with this strategy.
If you have a drop down menu, you might want to move the tab to the bottom. If you have live chat support, make sure the tab doesn't cover it.
We usually don't include the tab on mobile because it takes up too much space and cannot be closed out.
Note: You'll have to include a "Tab Rule" when building your trigger logic.
Checkboxes or dropdowns?
If you prefer to keep things simple, you can easily remove the checkboxes and dropdown sections. However, we included them to help you take your lead capturing to the next level.
The world is moving away from collecting and using third party data. This means you need to find new ways to understand your audience (hint: zero-party data), which is why these checkboxes and dropdowns are a good idea.
Here's your chance to ask visitors directly about their interests and preferences. You can then tailor your follow-up emails specifically to this information.
Checkboxes are ideal for brands selling to distinct customer personas. For example, an apparel company selling men and women's clothes. Or a pet store selling to dog-owners and cat owners.
You'll need checkboxes because readers should be able to select both boxes.
If instead you're asking an either/or type question, you can switch checkboxes for Radio Buttons. For example, if you're asking customers if they already own your best seller.
A dropdown menu comes in handy when you need more options. We've used these for brands in these industries: Supplement, Haircare, Skincare, Beauty, and Juice/Health.
If you offer solutions to different problems, you can ask readers for their top concern. If you help customers reach certain goals, list out the most prevalent. If your audience follows a certain journey, ask which stage they're at.
2. Pop-up technical setup
By now you should have a good idea of which pop up structure will fit your brand needs.
Once you've added the right one to your account follow the steps in this section to correctly integrate it with your Klaviyo account and Shopify store.
Justuno <> Klaviyo integration for email and sms
When using Justuno and Klaviyo, you set up the email and sms integrations at the same time:
- Click on the email field layer
- Click on "Change Form"
- Connect Provider > Select Klaviyo as your ESP
- Paste your Klaviyo API key, after creating a new one (found in Klaviyo under Account > Settings > API Keys)
- Add a Phone Number field and a Consent Checkbox
- Make all fields required
- When you integrate to your own Klaviyo account, the default checkboxes and/or dropdown will disappear. The next section will show you how to add them back in.
Setting up the checkboxes or dropdown
As noted above, you'll need to enter your checkbox/dropdown options after integrating with your Klaviyo store.
- Click on the email field layer
- Click on "Change Form"
- Click to update the "Form Preview"
- Under "Custom Field" select Dropdown
- The Field Name will appear as the Custom Property Title in Klaviyo

- The Label Options will appear on your pop-up
- If you'd like values in Klaviyo to appear differently than on the pop-up, select that checkbox and enter a different value (eg. the pop-up could read "Regular Skin", but in Klaviyo you prefer just "Regular")
Here's a Walkthrough for a dropdown. And here's how to add checkboxes.
SMS consent details
When you integrate a phone number field with Klaviyo you need a consent checkbox. Klaviyo will track the legal consent with a timestamp, which enables you to send out SMS messages to your profiles.
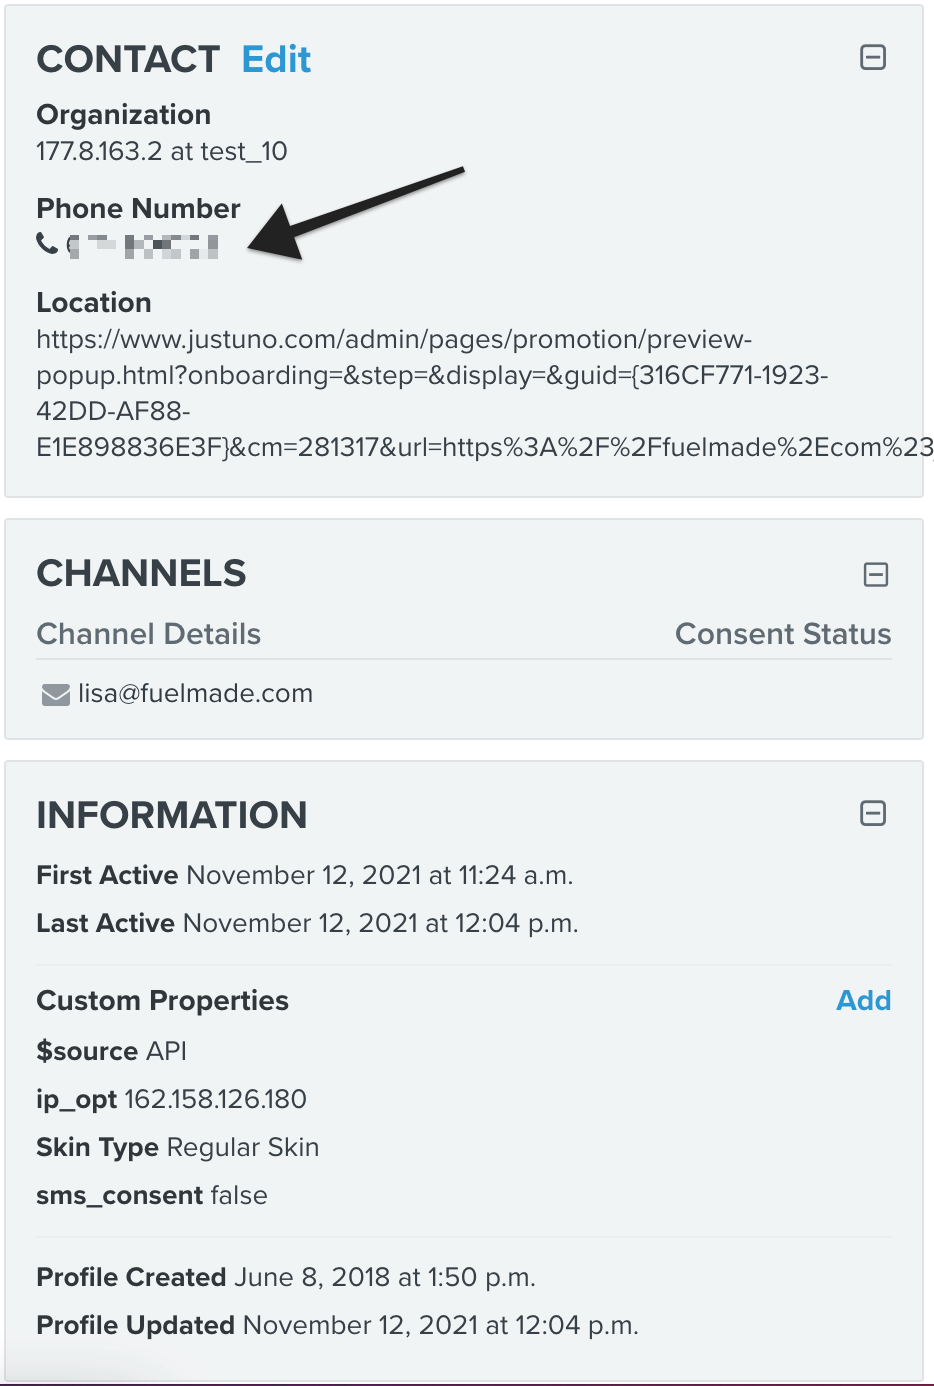
It's not enough to have a phone number appear in the Klaviyo profile like this:
You need to see this green checkbox appear as well:
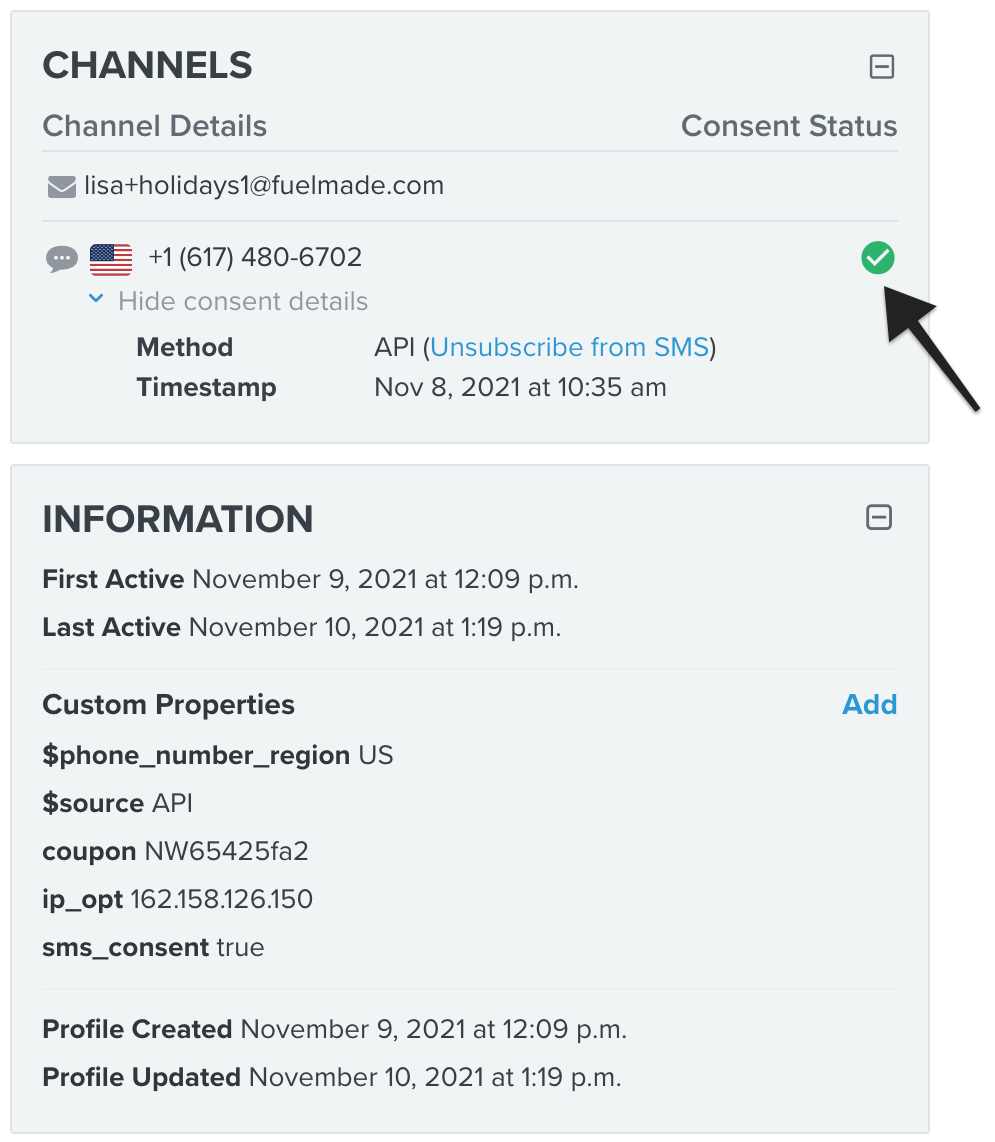
To get the green checkbox in Klaviyo you have to add the consent checkbox to your pop-up when you set up the Klaviyo integration (on desktop). After adding the email field and the sms field, don't forget to add an sms consent checkbox. Here's a walkthrough:

You also need a specific legal text next to your checkbox and don't forget to connect it to your Privacy Policy and Terms of Services pages.
Coupon codes
You can keep things easy by simply using the Klaviyo "Coupons" feature and send a unique code in your autoresponder email after a sign up. But where's the fun in that?!
Instead, we fetch a discount from Shopify. Then Justuno creates a unique code that we can show in the pop-up, directly apply to the cart, or include in a little tab reminder. Finally, we transfer this code to Klaviyo to send via email and sms.
Note: Sometimes we don't show the discount code in the popup. This forces your new subscriber to find your email with the code, which is good for your deliverability as it shows inboxes that readers are engaging with your emails. It's also a protection against people submitting fake email addresses and numbers just to get to the code.
However, you could also decide to include the code on your pop-up to make sure subscribers don't get distracted before using your offer and placing an order.
Step one: Justuno <> Shopify
- Add a "Unique Coupon Box" layer and connect it to your Shopify account (you'll need to have the Justuno App installed on your Shopify store)
- For the code fetching feature to work, you need your Shopify code to be limited to one use in total, and you'll probably want to also limit it to one use per customer.

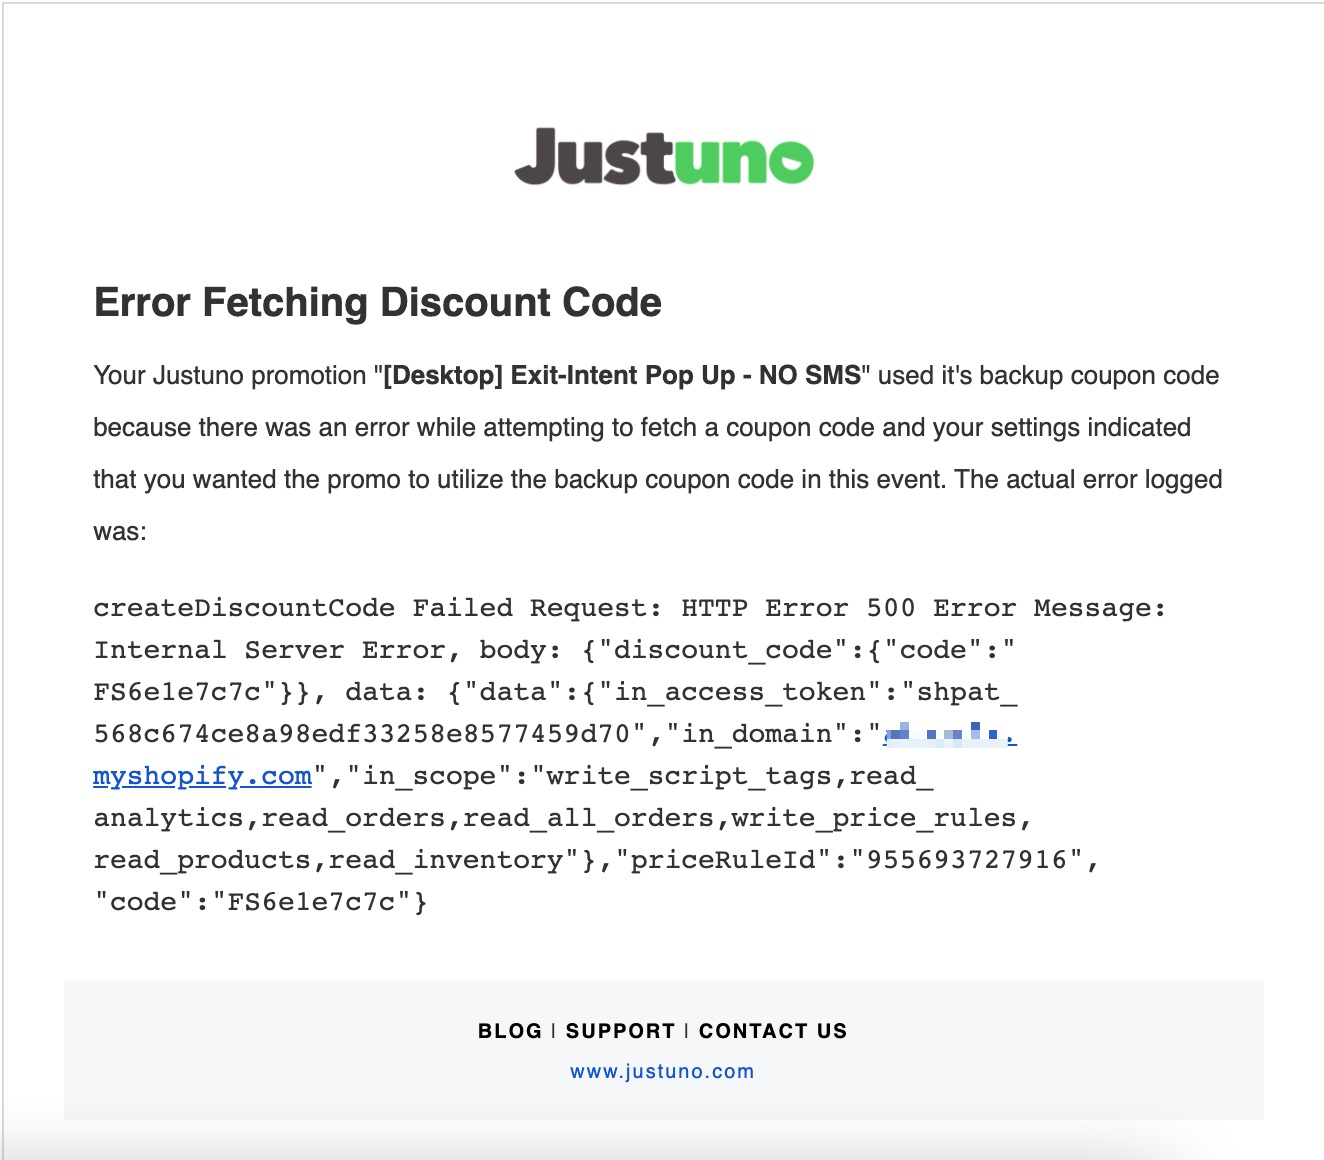
- For the backup code, simply create another Shopify discount with the same rules but don't limit it to one use. This code will fill-in whenever there's a glitch with the Justuno <> Shopify integration. It doesn't happen often, but it will happen and you'll get an error email like this:
- If you decide not to show the discount in the pop-up, simply hide the layer. But you'll probably want to auto-apply the code at checkout still (like this).
Step two: Justuno <> Klaviyo
When you set up your Klaviyo integration within Justuno, if you want to send the unique coupon code to the Klaviyo profile, you'll need to add a hidden single-line text custom field that auto-populates with the code:
 In my experience, the field must be called lower-case "coupon" for it to properly appear in Klaviyo in the profile properties.

Closing the form after a submit
You have two options for closing the pop-up window.
Either you add another screen after the SMS submission form. This final screen can display a "Thank you" message and could also give away your discount code if you go that route. But since our pop-ups already have an intro screen, an email screen, and an SMS screen, we sometimes prefer not to add yet another screen.
In this case you'll need to add a little bit of custom CSS code so the pop-up doesn't awkwardly stay open after visitors submit their phone number. Instead of this situation, you can make the "Submit button" also be a close button, like this:

How can you do this? Follow these three steps:
- Click on your "Submit" button on your last screen and rename the layer "Submit2"

- Click on the "Custom Code" in the top right corner > go to Pop UP JS > use this code:

- Toggle on the option to "Override Default JS"

SMS capture on mobile
On mobile pop-ups, you have the option to replace the phone number form with a simple button to opt-in. When the mobile viewer clicks the button it opens up a pre-filled text that will sign them up to your list. This is slightly easier than having them enter their phone number on your pop-up.
To set this up in Justuno within a Mobile campaign, you'll need to do the following:
- When you set up the Klaviyo integration via the email form layer, skip the part where you add a Phone number field and a consent checkbox.
- Instead, from the "Post-Engagement" screen, add a layer called "SMS Text Message."
- On the right side menu, under "SMS Number/shortcode" place your phone number.
- Within the "SMS Message" box, add a message that includes the Keyword that will add new subscribers to the correct list.
Like this, where the phone number is 1234567890 and the keyword is JOIN.
Note: You need to set up your Keyword within Klaviyo under Account > Settings > SMS > Subscribe Keywords.
 You will not need a consent checkbox. They are considered "consented" when they send a keyword to your number. However, you still need to show the legal text under your "SMS Text Message" button.
Your friendly Justuno experts—here to help
I know this article was more on the technical side, but hopefully you were able to access our free templates and start exploring.
If you have any questions about pop-ups or pop-up best practices, our team is happy to help. You can check out this article on building the ultimate pop-up, or you can contact our team to learn about our email marketing or CRO services.
Good luck with capturing more email addresses with your awesome new pop-ups!
